Heatmap
So far we've only played turns and seen how far off our answers are.
But to actually get a much more informative overview about our played turns and potential weakspots, there's a dedicated view: the heatmap.
It can be toggled via the heatmap button (in TopBar, rightwards of the start/stop button; that "wavy / heat" icon; not shown below) or via 'w' key.
This image shows an already populated heatmap after quite a bit of training. Initially, or after a reset, a heatmap is empty and will show a lot less than this. The following explanation will start off discussing what the heatmap is showing and how it's being populated, then followed up on how its results are to be interpreted.
Rating concept
Every snap point has its own rating.
Initially it's neutral.
Every played turn thereafter will have had a "spot on" solution and the actually given 'user' filter position (your answer).
How far apart these two are is what determines the resp. turn's 'rating delta', which adds up to the resp. snap point's overall 'rating'.
The "solution" always is the inverse of the 'altered' filter. See chapter Training objective (single turn) for detailed explanations.
Again, what's being rated is how close your answer was to the 'solution'.
The 'rating delta' will be positive when your answered 'user' filter is "spot on" or close to the 'solution' filter, within the correct half (upper or lower / boost or cut)..
The 'rating delta' will be negative when your answered 'user' filter is further off from the solution.
If the given answer has the wrong gain, an additionally rating delta penalty will be applied, which, unless the answer is very close to the solution, will give the worst case 'rating delta' pretty quickly.
In case you are interested in numbers: 'rating' can go from +1.0 (good) to -2.0 (bad), 'rating delta' can be anything from +0.5 to -0.5, neutral rating is 0.
As a result, being "spot on" just twice in a row, starting from a neutral rating, already clears a given 'snap point'.
Whereas being shaky in one's answers, potentially reaching far into the negative rating, will require that many more
"good answers" to reach a cleared state thereafter.
This asymmetry was deliberately choosen for sake of rewarding skill and giving plenty of practice opportunity to the
'snap points' one finds more challenging.
As already mentioned earlier, the selected difficulty's 'rating falloff' also has an impact on the calculation of the 'rating delta' (i.e. higher difficulties are less forgiving and reach negative 'rating_delta' sooner as one's answers are lacking).
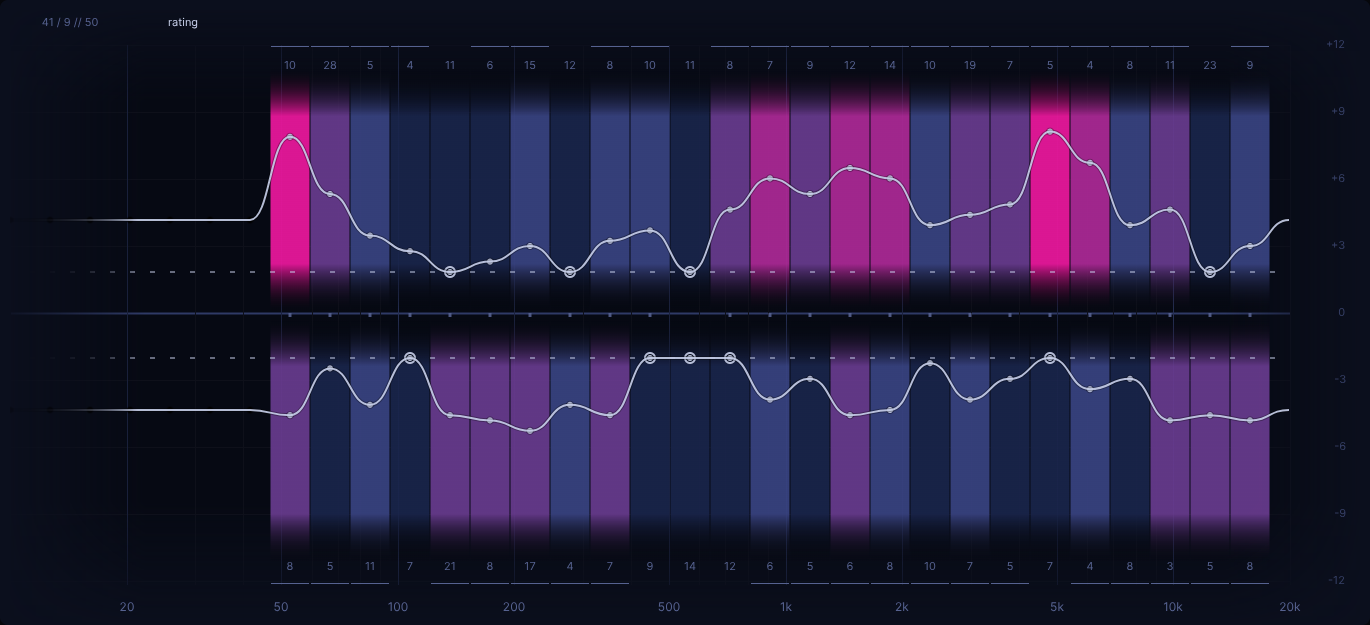
Heatmap view: rating
There exist various heatmap views, with 'rating' being the default one.
Within the heatmap, every snap point that has a rating will have a colored 'rating strip' and a small white 'rating dot'. The better the rating, the closer the rating dot will be towards the vertical center (i.e. the dashed reference line to be exact) and the more the rating strip's color will go towards blue-ish color. The worse the rating, the further away from the dashed reference line and the more pink-ish the color. Additionally, all rating dots within one half are connected by the 'rating line'.
Towards the top / bottom one can see some numbers, the so called 'evaluation count' (or 'eval count' for short).
The 'eval count' simply states how many times that snap point has been given a 'rating delta' due to having been picked as the "solution" filter position and having received an answer.
Strictly speaking, the eval count numbers are only showing all at once for difficulties 'entry', 'novice', 'medium' and 'advanced'.
For 'ambiguous' and 'ruthless', due to lack of space, only the currently focused 'user' filter position's 'eval count' will be shown.
Heatmap view: eval
Regardless of eval counts showing all at once or not, it's not the most visually apparent where the higher numbers are.
Due to this, an alternative heatmap view exists: 'eval'.
It can be selected via:
- the heatmap view dropdown menu (try clicking the label which indicates "rating" by default)
- toggled via
'alt + w'shortcut
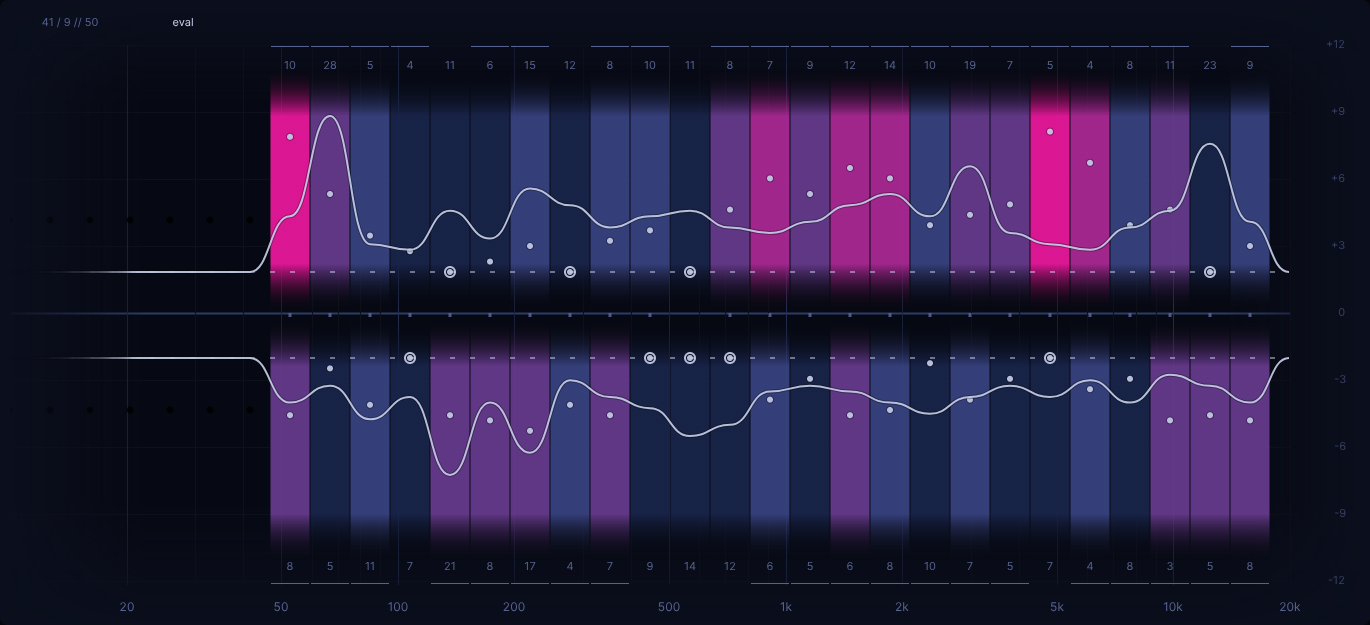
The concept here is that the further away from the vertical center the line is, the higher the eval count (i.e. relatively speaking among all existing eval counts in the heatmap). The reference line effectively also indicates "eval count equal zero" (in addition to "best rating").
Visually the eval count line drawing can be distinguished from the rating line drawing via two aspects:
- the heatmap view (top left dropdown label) showing "eval"
- the fact that the line doesn't necessarily follow the rating dots (visually the easiest to spot)
- the fact that for "unrated" snap points (i.e. no coloring), the line follows the reference line (opposed to the rating line, which starts off at "neutral rating height")
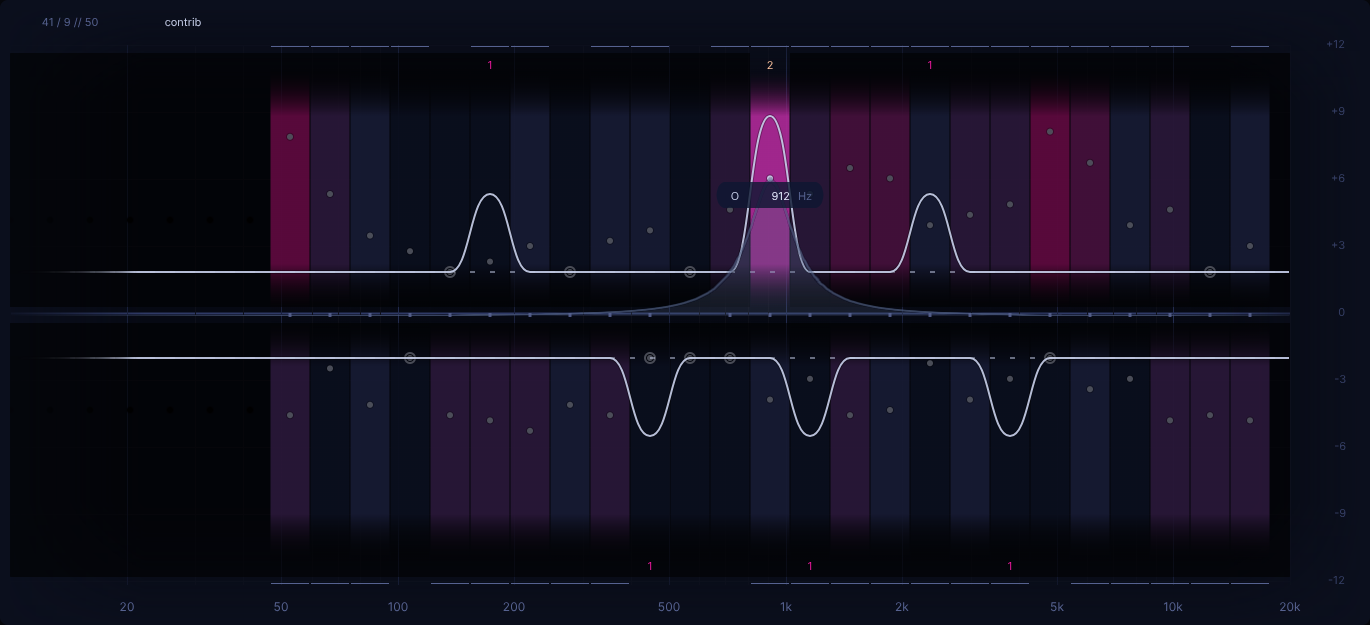
Heatmap view: contrib
Let's assume for a moment that there's a snap point that's giving you a hard time. Maybe it has a bad rating, maybe it has a noticably higher eval count than other snap points. In that case the question becomes:
Why? What contributed to that snap point's rating / eval count?
This is where another heatmap view comes into play: 'contrib'.
It can be selected via the usual heatmap view dropdown menu, or be toggled via 'alt + e' shortcut.
The general workflow here is like this:
- use heatmap view
'rating'or'eval'to determine the snap point you are interested in - focus it via the user filter
- while not moving the user filter, switch to heatmap view
'contrib'(e.g. viaalt + e) - evaluate what you see
- toggle back to
'rating'or'eval'view to pick another snap point of interest - ... repeat from step 2 onwards ...
Alternatively you can also stay in 'contrib' view and just sweep around the user filter, though this is bit less targetted.
For our heatmap example above, we have choosen a snap point in the upper half, which had an eval count of 7 (compare to section Heatmap view: eval).
The basic idea behind this heatmap view is that for the focused snap point, it will indicate all the given answers that
contributed to that snap point's 'rating' and 'eval count'.
Regarding the visual interpretation:
- the
'eval count'numbers (towards top and bottom) now indicate the number of times the contributing snap points were given as an answer (the sum of them adds up to the snap point's 'eval count') - the
'eval count'line itself now indicates the relative occurence of the contributing answers
Heatmap views in general
Except for heatmap view 'rating', training is not possible while the other heatmap views are showing.
In general we don't recommend having the heatmap showing during training anyway, cause it's distracting and won't make you rely on your ears fully.
Nevertheless, we decided to allow one to view the heatmap in heatmap view 'rating' during ongoing training can be nice to have, esp. in the beginning when one tries to wrap one's head around how the heatmap is coming to be by playing turns.
Furthermore, while heatmap view 'eval' or 'contrib' are active, user filter selection will snap to already rated snap points only.
This is done to ease evaluation esp. on higher difficulties with lots of snap points and potential "gaps" between them (also the main reason for why training isn't possible on these).
When it comes to the resp. shortcuts around heatmap view selection: alt + w and alt + e, they are designed in a way that allows for arbitrary switching between various heatmap views.
Simply try playing around with them to get a feel for it (note: they are context aware based on the currently active 'heatmap view' and can "toggle" back and forth).
Reading the heatmap: ongoing heatmap
First, let's recap what the meaning of a badly rated snap point is:
A bad rating / high eval count indicates one had a challenging time in "balancing out" the random 'altered' filter change by giving the opposite filter change via the 'user' filter as an answer (the "spot-on solution").
We'll now look at a couple hypothetical scenarios to explain how to "read the heatmap", starting off in heatmap view 'rating'.
The most obvious thing are bad ratings. Whenever you see some of those bright pink-ish colors and a rating line far away from the vertical center, you know that your respective answers for those snap points where lacking so far. Meaning
In this example it's those two peaks in the upper half, one in the low end, one in the high end. Furthermore there are mediocre ratings in the mid range. Regarding the lower half (which is about balancing out random boosts) it certainly looks better at first glance.
But it's always a good idea to also look at heatmap view 'eval' and its eval count line.
Reason being that a snap point having a mediocre or bad rating while only having an eval count of 5 is not as telling as one having an eval count of 30. In the latter case it means that despite having been given a lot more chances, one still can't consistently give good enough answers to achieve a better rating.
Even if you eventually end up with good ratings for all snap points, looking at the eval count line can show you how many tries it took you to get to that good rating. After all, there's a big difference between having needed 2 guesses opposed to 20 guesses for achieving the same "good" rating or "cleared state".
In the above example, the highest eval count is in the upper half (boost) low end. Even though it's rating isn't that bad, simply by looking at the eval count, one can see that despite 28 tries (see eval count number on top) it still wasn't possible to achieve a better rating. Another thing to look out for is the upper half (boost) high end. Even though those two snap points both have a good rating (one even being cleared already), their eval count values are highly different. Therefore one can judge that the snap point with an eval count of 23 likely was a bigger challenge thus far. Overall there are quite a few of such cases present here.
Considering all the above, one's weakspots aren't just snap points with bad ratings, but also snap points with high eval count values (i.e. high compared to other snap points). So really only after looking at both heatmap views, 'rating' and 'eval', can one make an informed judgement.
At this point one might think that the actual eval count numbers above / below each snap point location are rather pointless. After all the eval count line is a lot more visual. But that's not quite true. Reason being that the eval count line's range is determined by the highest eval count value of all snap points. This can result in a similar looking "peak" for vastly different eval count values. Therefore it's always a good idea to also check at least the actual number of the biggest peaks and some other points of interest, just so one can get a feel for the "general range" of values that have lead to a given eval count line.
Due to images of EQdrill being resized to fit the documentation, it can indeed be quite hard to read those small eval count numbers. In this case we suggest to zoom in a bit via the browser. Regardless, when looking at them in context of EQdrill itself, they can be read more easily.
Reading the heatmap: fully cleared heatmap
As mentioned earlier, once a given heatmap is fully cleared, heatmap view 'rating' becomes quite pointless.
Rather one should start off by looking at heatmap view 'eval'.
In a sense, once a heatmap is fully cleared, heatmap view 'eval' becomes easier to read.
Simply because one no longer has to consider the interplay of snap point rating and eval count at the same time to
come to a proper interpretation of the heatmap.
Rather, because all ratings are "best rating", only eval count matters then.
For an actual interpretation of a fully cleared heatmap, please refer to chapter Clearing.
Heatmap algo
Another topic is the so called heatmap algorithm (short: 'heatmap algo').
The heatmap algo impacts the way the random 'altered' filter is being determined. Assuming there are 30 snap points available, the probability for any given snap points being picked would be 1/30. But due to the heatmap algo, the actual snap point rating will also be considered in addition. That is, the worse the rating, the higher the chance of it being picked. A consequence of this is that the ear training will become biased towards one's weakspots once they become apparent (if any). This results in a more effective, targetted training compared to when being asked on a purely random basis.
Heatmap reset
To get the heatmap back to its initial state, you can "reset the heatmap".
Effectively resetting all the ratings and eval counts of all snap points.
To do so, use the 'reset heatmap' button in the dropdown next to the heatmap button or press 'shift + alt + r' (it will ask for confirmation).
A heatmap will only be reset via this mechanism, never when changing settings, switching the difficulty, or when closing the application itself.
This begs the question:
Isn't resetting the heatmap making one lose the information on one's weakspots?
Yes and no. It's true that once the heatmap is reset, the next round will start off from a blank slate again. But that doesn't mean you've lost your previously acquired skills, nor will it make you forget about your previous weakspots right away. But even if you forget about your weakspots immediately, it actually doesn't matter. Reason being that if a true weakspot still exists, it will come up again rather soon during further training. In a sense, every heatmap is a new assessment.
It might help to think of playing on a given heatmap like playing a game of chess. Even if one starts over, it doesn't mean being back at square one. The "game" is put back to the beginning and seemingly hasn't changed, but oneself likely has and therefore the outcome of a new round likely will be different.
That being said, if one wants to leverage the result of the "finished" heatmap (e.g. because one wants to "double down" on the more challenging snap points), then there are ways to set up the snap point selection based on it (i.e. prior to resetting the heatmap). This will be discussed in chapter Snap edit.
On a last note, once more, while in theory it's possible to play turns while the heatmap is showing, we don't recommend it, cause visually it's quite distracting during training and it certainly won't make you rely more on you ears.
Just for sake of being transparent and giving a small "sneap peek", even after resetting a heatmap, it isn't really lost. EQdrill actually stores all heatmaps to a local, client-side database. Future versions of EQdrill are planned to give access to already reset heatmaps via resp. new features that aren't yet implemented at the time of writing this documentation.