Training objective - clearing
We haven't yet talked about what happens when the "best rating" for a given snap point is reached.
This is where the so called 'clearing' aspect comes into play.
Once a snap points reaches the "best rating", it will be considered 'cleared'.
It's indicated in the heatmap via a circle around the rating dot. Additionally the snap indicators will be colored slightly differently within snap edit mode and completely hidden outside of it. So that means that during normal training, as snap points become cleared, the respective snap indicators start to disappear one by one and the locations one can put 'user' filter diminishes.
Effectively, when it comes to training, it means that a cleared snap point will be treated the same as a disabled snap point: it can no longer be picked as the random 'altered' filter.
Snap stats
Within the heatmap view top left area, some numbers are showing, so called 'snap stats'.

The format is 'A / B // C':
- A: 'non-cleared' snap points (regarding "enabled" snap points)
- B: 'cleared' snap points (heatmap overall; regardless of "enabled" state)
- C: 'enabled' snap points
Benefits of 'clearing'
As one is playing a round and is performing well regarding some snap points, those snap points will be considered "good enough" and no longer be asked. Therefore the training will concentrate more and more on the remaining, potentially weaker areas without any need to configure snap points manually during an ongoing round based on heatmap state.
Additionally it serves as an objective: "clearing the heatmap". Or differently phrased, "clearing the initially enabled 'snap pool'".
This begs the question:
How quickly can one clear a given 'snap pool'?
Considering that the neutral rating is 0, best case rating is 1.0 and a "spot on" answer gives a rating delta of +0.5, one can rephrase the question to:
Starting from a reset heatmap, how quickly can one give two "spot on" answers in a row for all enabled snap points?
While one certainly can try to come up with a time estimation for this, it is of rather little value due to being a rather hypothetical scenario that likely can never be fully reached in reality. Well, in our experience, given enough patience and attempts, it can be doable for the lower difficulties, but less and less so for higher ones.
That being said, it highly depends on your skill level. For example, playing on 'medium' difficulty, having 24 enabled snap points, having decent skill but still some weakspots, taking your time to reflect on your answers, for a while it might take you 10 minutes to clear an initial reset heatmap in one go. Or maybe closer to just 5 minutes. Really depends on skill!
It's worth paying attention to your "stats" shown in heatmap info window. Over time you will get a feel for roughly how much time it takes you to clear a given number of snap points. If it takes you let's say:
- 5 seconds on average to give an answer
- 5 seconds on average to review your answer
- times 2 (spot on answers)
- times 24 (snap points)
... then it could end up taking roughly 8 mintues to clear such a heatmap.
But this really assumes every answer is "spot on". If it takes you on average four answers to clear a snap point, that duration will accordingly double.
So depending on how challenging a heatmap is set up in terms of 'gain' and 'Q', and how many snap points are
enabled, the 20 minute mark can indeed be breached at times.
Our recommendation is to eventually favour "moving fast" and not getting too hung up on the review part after every turn. This allows one leverage "fresh ears" and good focus more effectively and leave the more in-depth review part for after a heatmap reaches a cleared state.
About the higher difficulties
So what to do with those higher difficulties that have many more snap points?
Assuming you have lots of snap points enabled (see the second value of the 'snap stats'; see above description), it can easily happen that you won't be able to clear them all in one session. But that is fine, cause as already mentioned, the heatmap isn't lost just because one closes EQdrill. So it's certainly doable to train with the same heatmap over the course of a couple sessions.
Then again, nobody is being forced to "fully clear 'ruthless' difficulty"... It's perfectly reasonable to choose a high difficulty, but restrict the snap selection to e.g. just the "upper mids" and then try to "clear" just that.
The thing to remember is this: If you are good with certain frequencies, then you might reach "cleared" within a couple turns. But if something challenges you, then don't be surprised if it takes you well above that (maybe even a couple dozen turns).
What happens once "fully cleared" is reached?
A couple things:
- the statistics tooltip will show (refer to chapter Statistics)
- the Heatmap info window will show
- heatmap will appear with heatmap view
'eval'enabled (this gives a quick overview on which areas took most effort to clear)
What other objectives are there?
Apart from simply reaching a "fully cleared" state eventually, one can also strive to get to that state with fewer turns. After all, the information on how many turns have been played on a given heatmap is there. Assuming one keeps all settings and the snap selection the same, taking less turns to "clear the heatmap" (or rather snap selection) certainly is a measurable improvement.
Furthermore, as already mentioned in chapter Snap edit, one can leverage the previous heatmap for setting up the next one (i.e. before the heatmap is reset).
Reading the heatmap: fully cleared heatmap
Now let's look at this "fully cleared" example:
We already discussed in quite some depth in chapter Heatmap, how one can review a given heatmap using the available heatmap views. Nevertheless, let's apply a quick interpretion to this example as well.
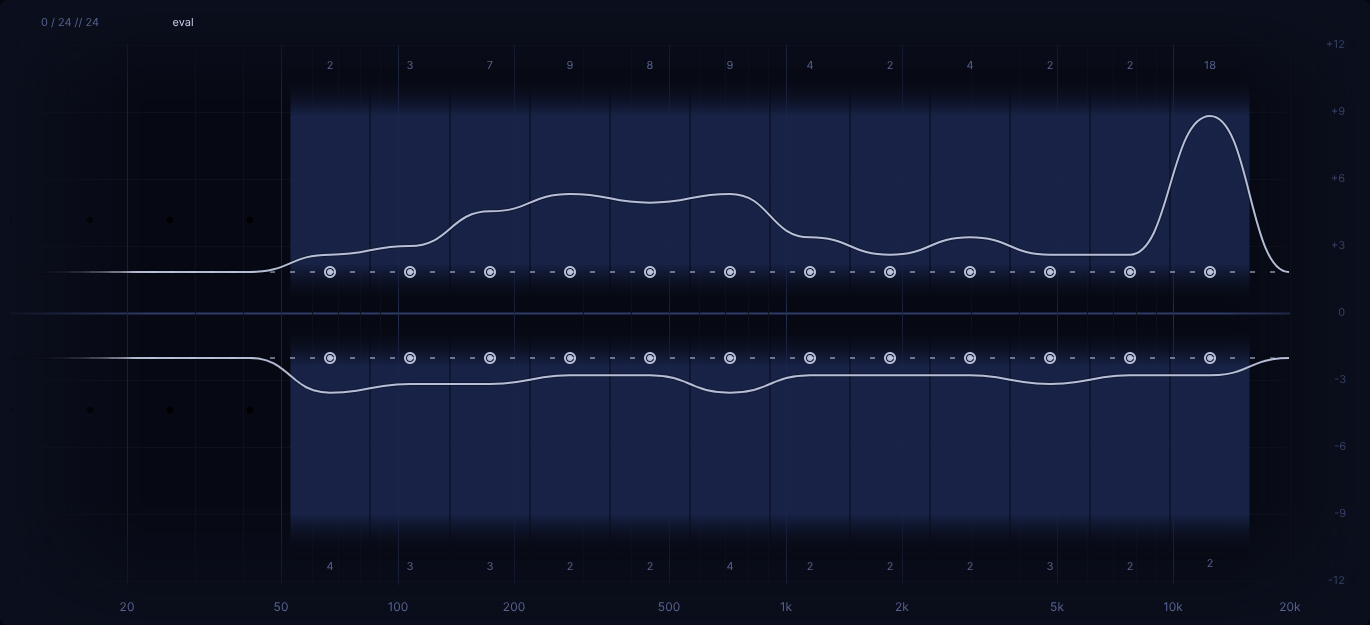
Starting off in heatmap view 'eval', we can see that in the lower half, it's looking quite solid actually.
Let's remember: the lower half is about balancing out random 'altered' filter boosts via resp. 'user' filter cuts.
Around half of the snap points here got cleared with two spot on answers (hint: try zooming this page to make those
rather tiny snap evalution counts more readable).
The other half took at most four tries per snap point.
Nothing wrong with that!
Consider this heatmap was done using a gain value of '6 dB' and a Q value of '2.5', it could be worthwhile as a next
step, at least from the perspective, to maybe lower the gain somewhat, just to increase the perceived difficulty a bit further.
Looking at the upper, which is about balancing out random cuts via resp. boosts, it looks a bit more shaky. While there are several snap points that seem confidently cleared, the low mids seemingly took bit more effort. And of course, the elephant in the room in this case is the top end, which took twice as many tries as any other snap point.
Let's leverage heatmap view 'contrib'.
First let's look at a "good case" scenario.
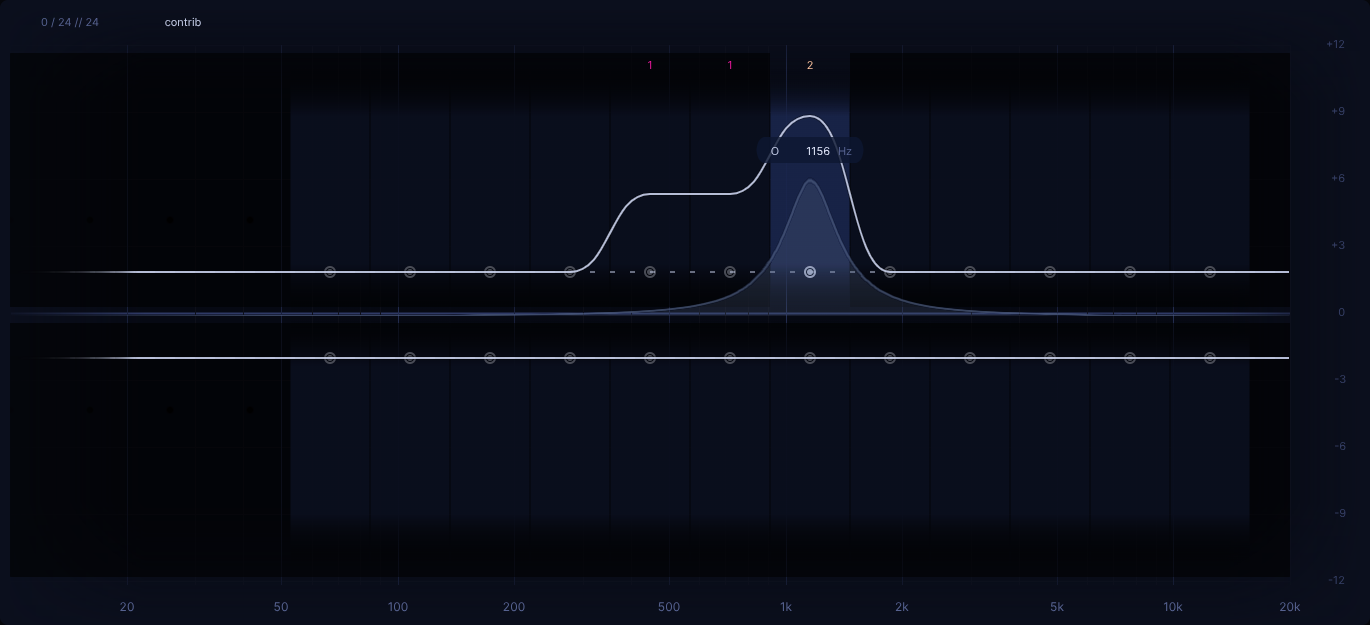
This snap point around '1.1 kHz' took four tries to clear, all being rather close to the ideal answer. Nothing in particular to take note of here, cause the general trend of the given answers is quite clear.
Now let's look at that top end snap point:
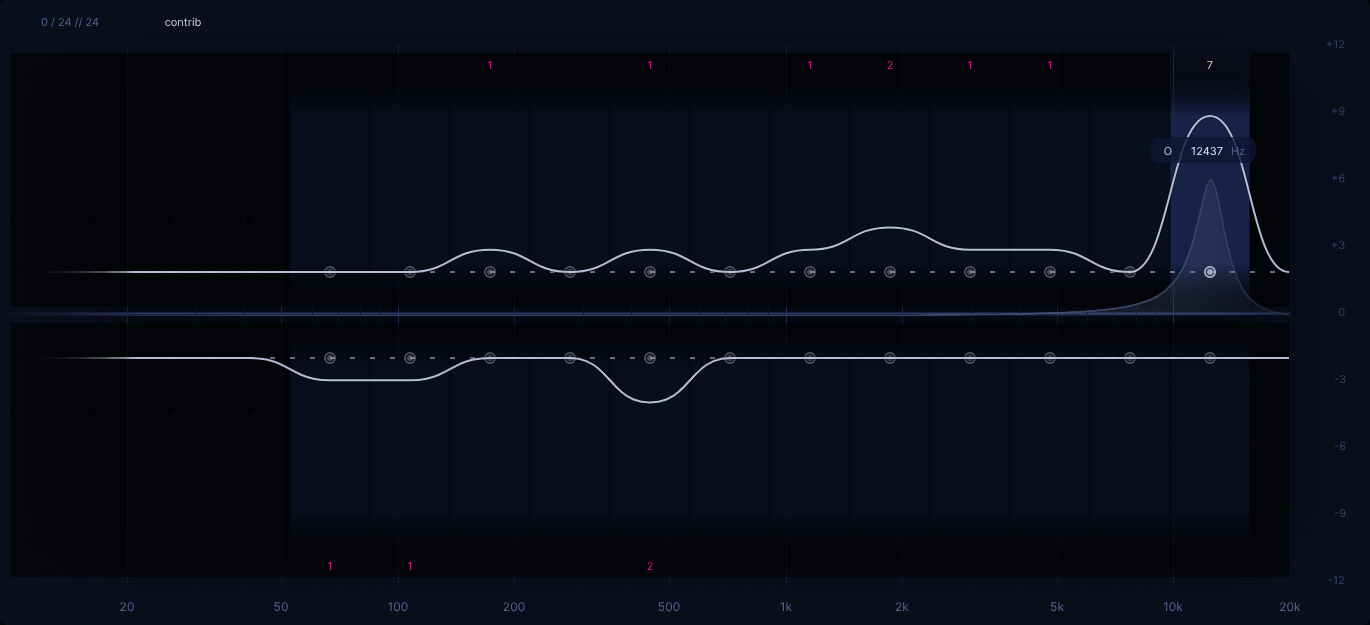
Looks quite all over the place, doesn't it?
Yes, certainly a very valid first observation. But let's try making sense of it a bit more!
In general, answers that are all over the place, more often than not indicate one simply wasn't sure what answer could be at all, hence some rather random trying of various answers over various turns.
Another thing worth keeping in mind, whenever it's about the bottom or top end, one should pay attention to the opposite side, with the opposite gain.
Why that?
Potentially there's some know psychoacoustic effect that could explain this phenomenon. But to put it in layman's terms: "It's like a seesaw!"
In this particular, we mistook a random cut in the top end for too much low end being present, hence the give answer being a cut in the low end. A lack in top end can indeed make it appear as if there's too much going on elsewhere, potentially esp. in the low end, cause it can sound like the balance is skewed towards the low end.
In our experience, when training with EQdrill for a while, one comes to realize such misleading scenarios that keep coming up across various heatmaps over time. They certainly give some food for thought!
Any other inpretations one could derive from this?
One more thing always worth considering is the "source material", i.e. the reference track one used for a given heatmap. For instance, if one had some noticable challenge with the top end, maybe the given reference track just happened to be on the darker side from a frequency perspective As a result, further cutting of the top end might not have stuck out as much, hence it wasn't as obvious as it could have been on a brighter reference track.
Same could be the case for the low end for instance, maybe not predicated on general meger low end of a given reference track, but maybe just a situational lackluster low end. Though this brings as back to something already mentioned in chapter track choice:
It's hard to perceive an EQ change in the low end if there's next to no low end to begin with!
Hence the recommendation to either loop generally frequency rich section of a reference track, or at least jump to such a section to double check if one is in doubt whether it might be about the low end.
But in general, we recommend to you simply take a bit of time after clearing a heatmap and try to come with your own interpretion like done above. With time one can certainly also get better at reviewing heatmaps!
Doubling down on the weak spots
It was already discussed in Heatmap chapter that in the above case, one could decide to work on the weak spots in the upper half (i.e. the issue here was that one was worse at "balancing out cuts" via giving proper "boosts" as an answer in the upper half).
Of course one could enter 'snap edit' mode and make a manual snap selection based on this info.
But this is also a great usecase for the 'focus' slider.
Simply moving it towards the right until only the snap points with high eval counts are left enabled.
Applying this approach to one's training basically means to "double down" based on the previous heatmap's result by playing another, more "tailored" heatmap that focuses on one's individual weakspots. Most likely one will have less snap points enabled in that second round, which will likely shorten it's required duration to get to "fully cleared" again.
Though it's worth emphasizing that "doubling down" like this isn't mandatory. Rather one can just play another heatmap and rely on the fact that due to EQdrill's "clearing" mechanism, any snap points that aren't really much of a challenge to oneself anymore, most likely could be cleared rather quickly. So by design, one inevitably will spend more time on the more challenging snap points anyway.
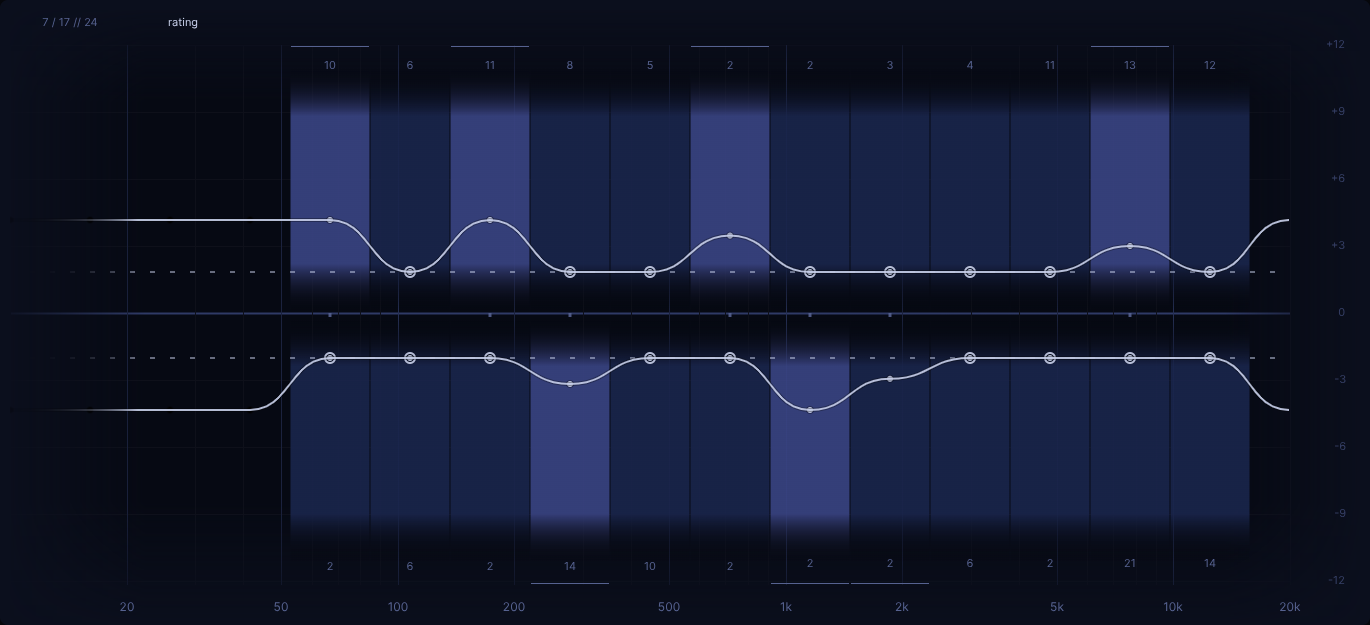
If ever you are in a situation in which you don't seem to be able to move the 'user' filter to an already cleared snap point position, you can hold 'shift' modifier while moving your mouse to ignore that default "mouse snapping" behaviour.
This can be useful while looking at a heatmap while in heatmap view 'rating', but is rather pointless during actual
training as in the latter case it's out of question that an already cleared snap point would be the solution.